
Around the first of February and quite unexpectedly I was contacted by my daughter and informed she was going to be attending a formal dinner/dance mid-February. Okay… short notice but at that point, I had two options; help her buy a dress or make her one in 2 weeks.
I had never made a formal. I worked for a short while at a tailoring shop and did some formal alterations but had never actually sewn one. But, I just could not bring myself to spend hundreds on a ready to wear which would most likely require alterations and hemming and more money for a proper fit and which would not look completely cheap. So, I determined I would make her one in the 12 days available.
I set about sending her links to patterns and perusing Indie designers for a possible pattern. We needed a simple but elegant design with normal run of the mill sewing techniques. After looking at a dozen or more possibilities, we settled on Vogue #1520, a Badgley Mischka design which was shown on the pattern cover in a red stretch velvet and which could be picked up at my local Joanns for $5.99!

In December, I had taken advantage of a Marcy Tilton Fabrics sale and purchased 4 yards of this beautiful gunmetal stretch velvet. My daughter is all about wearing dark color(s): black, blacker, blackest but will consider some grays or darker neutrals. 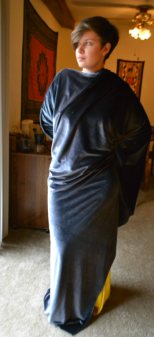 She actually adored the gunmetal fabric which was good because frankly I was not going to buy anything different with less than 2 weeks to sew. For the lining, I opted for a spandex blend sportswear fabric from Joanns which had some wicking properties.
Next commenced A LOT of research on how to sew with stretch velvet.
After viewing many web posts and several videos, here is the list of what worked splendidly for me. I had not one issue sewing the fabric following the list below.
- In the machine I used poly thread and a 75/11 ballpoint needle.
- I chose NOT to use a walking foot, rather to hand baste all my seams securely before machine stitching them. For all hand basting I used silk thread.

My coveted box of silk thread spools. It slide right through the fabric and did not leave holes of any sort. I also used a small fine sewing needle, a milliners size 12.
- Prior to hand basting I used lots of silk pins, pinning parallel to the edge and inside the seam allowance. Again, no holes left in the fabric. I removed pins as I basted.
- Tailor Tacks were used for all my pattern markings and here I did not use silk thread. Instead, I used a cotton basting thread as I did not want the tacks to come out as the gown moved around in my sewing room. I did notice very slight holes left by the thicker thread but it was not going to be noticeable in the final garment.
- For cutting – I laid out a thick terry bath towel on my cutting surface and placed the fabric right side down cutting from the wrong side of fabric. The nap of the fabric will not slide against the towel! This saved me a boat load of troubles. Also, a friend recommended using those small glass stones for flower arranging as pattern


weights. A full bag of the stones was purchased inexpensively from Hobby Lobby.
- Before cutting I had to determine which nap I wanted to go with – up or down. Up produced a deeper, richer color; down produced a lighter reflective color which allowed for the play of light on the fabric. I went with down.

In the above picture the left smaller pattern piece is placed in the opposite direction as the long piece on the right. I did not worry about nap on my muslin, but this placement could not be used for my real fabric! - When cutting was complete, I moved the terry towel to the ironing board and made sure I had a fresh clean silk organza press cloth. I never actually touched the fabric with my iron, only hovered just above the seams and used steam. The towel prevented the fabric from being crushed by any inadvertent pressure.
- I did not have to adjust tensions on my machine or loosen presser foot pressure but read that one might have to. I sewed many test samples prior to beginning my actual sewing on the garment.
- I used a small zigzag setting on my machine for some seams but my serger for any long vertical seams I could. Aside from massive amounts of fuzz generated by the serging, the fabric and my serger got along just fine. My sewing machine settings were stitch width 1.0, length 3.0.
Due to the train on the gown and the fabric having a nap, 4 yards of 60” fabric did not prove to be enough! I laid out a bed sheet on my living room floor and attempted to place all the pattern pieces before I ever started to cut. I was mere inches short! Disappointing.
Now, it was up to Marcy Tilton having more of the fabric I had purchased in December. I gave them a call and found they did! I ordered 2 yards in case I made a mistake somewhere (but not sure that would have been enough to fix anything). I have ordered from MT several times and each time their customer service has been outstanding. The fabrics I have received are as described with exceptional beauty and quality. Highly recommend.
While I waited on fabric which was due to arrive the Tuesday before the event, I made a quick muslin out of a yellow poly crushed velvet costume fabric. Although it had similar stretch properties and was a velvet it was not nearly as beefy. It would have to do.


It turns out my daughter looks smashing in yellow! (A few days ago I showed her these pictures and she agreed she would like to try some yellow in her wardrobe!) Here she is in the muslin version with her black gloves. Unfortunately she left the gloves in New York so I do not have good pictures of her in the gunmetal gown with the gloves!
Early on we had decided to forgo the sleeves. The only other alterations were to lower the front neckline and to take off about one inch in length at the shoulder seams. I also decided to edge serge, versus the actual 5/8″ seam allowance, the long vertical seams to give her a bit more room around the middle section.
I did not want to gather on the machine but one thing I had read when looking at other makes of the pattern were problems with the gathering stitches not staying put due to threads slipping through the velvet. Another friend suggested I use buttonhole twist which I did and it worked fabulously.
In the pictures below you can see the black gathering stitches using the twist, the yellow tailor tacks and my basting with silk thread. The stay tape was a good idea in theory but it would not stick to the velvet and kept peeling off. Eventually, I just pulled it off, making sure my gathering stitches were very secure and called it done!


And here the finished gathering from the right side:


I did encounter a couple of issues. I had accidentally cut out the main front piece with the pattern piece face down! This put the slit on the wrong side! Unfortunately, I did not realize it until I had the main and lining pieces completely assembled so I was not able to correct it but simply placing the lining piece face down! I sewed up the lining side slit and just cut a slit between the main pieces and under stitched to keep it from rolling to the outside.
My other issue was the weight of the gown and it being sleeveless and the fact that I could not get a stay tape to actually stay in place.
 I used a stretch velvet ribbon from Britex Fabrics first serging it to the edge and then simply folding it over and hand stitching in place. At the neckline I cut strips of silk organza (should have been on the bias but I forgot to do that so had to notch and clip a ton) and sewed that into the seam between the main and lining fabrics. These fixes worked very well and the velvet ribbon proved to be a nice finish for the armscye.
Finally the hem which was hand stitched to avoid damaging the fabric. This part took the longest and was the most tedious! But the result was well worth the effort. I used more silk thread for the hem. This was probably the first garment I have sewn where throughout the process I always chose the more labor intensive route even knowing I had a time crunch. Because the pattern itself had simple, clean lines I was able to spend more time on construction details. I am happy to say the dress was a complete success and received many many compliments!


Thank you posting this. I knew something was incorrect with the front piece but when I called the company the person that I spoke with was so rude and was very adamant the nothing was wrong with the printing of the pattern. Thank you so much.
LikeLike