
Welcome to the Sew Long Summer blog tour!
A nice group of sewing bloggers are going to share with you how we say “Sew Long Summer” and we’ll be asking you to join in with a Social Sew too (read on for details and prizes)
Sew Long Summer is all about getting those transitional wardrobe pieces ready; finishing up all those things we meant to make this summer; and well, basically whatever Sew Long Summer means to you.

Share what you’ve been making to say “Sew Long Summer” to be entered into our random drawing.
Continental US participants will be entered to win a $20 store credit from Simply by Ti Fabrics.
All other participants will be entered to win a pattern of choice from DG Patterns.
To enter, please tag your sewing project with #SewLongSewcial18 on Instagram or facebook. You can also leave a link in the comments on the mahlicadesigns intro post. Please limit your entries to items you’ve sewn between Sept 10th and Sept 28th 2018. Winners will be notified and announced shortly thereafter.
We can’t wait to see what you’re making.
On August 26th I awoke and found it necessary to put on my cozy winter robe for the first time since April. The outside temperature was 49 degrees. Already the occasional red or pink tinted leaf is found laying lonely in the grass, soon to be followed by many friends; and in the past week several days had the distinct hint of fall. I can’t say this is my favorite time of year. I love everything about summer and always mourn its passing!
One great positive this time of year is fall sewing. My stash is bursting with warm wools, plaid flannels, heavier twills and fabrics suited to cooler temperatures. I do find it easier to sew for me in the fall and winter and I greatly enjoy sewing outerwear.
To help me get a jump start on fall sewing, I joined the Sew Long Summer Blog Tour hosted by Melissa. For the tour, I made the Twig and Tale Trailblazer Vest. I was introduced to T&T patterns through their Aviator hat pattern which I sewed for my new granddaughter last year. It turned out beautiful and was a fun sew.
The Trailblazer has front and back princess seams, front inseam pockets, two back lengths options, a zip closure with or without a wind guard and a stand collar or not.
I went with a straight back hem, the stand collar and planned to sew the wind guard. First I made a quick muslin to check hip and shoulder fit. I was pretty pleased to see that both seemed okay so I decided against any alterations. I was a bit concerned about hip circumference if wearing bulky clothes and having enough wearing ease but, decided to press on with size i.


The fabric I chose was a 32″ wide light pink and cream vintage cotton tweed with burgundy flecks which has been floating around my sewing room for several years. For the lining; a pink poly, again from my stash. For all my stash options available, it was kind of a boring pick but, due to time constraints I determined early on that I did not want to pattern match.


I think it was because the fabric was a bit on the boring side that I kept going back to the tester photos and googling pictures of the vest. I thought I would end up with a nice vest no matter what, but really liked the idea of some contrast on the shoulder yokes and possibly the collar as well.
In the next town there is a lovely leather goods shop which sells purse hardware, leather sewing tools, flawed leather hides and ends and pieces. I decided it was worth the trip over to have a look so, armed with my two fabric swatches, I set out. I was pretty much committed to simply adding leather for shoulder detail and the underside of the wind flap when I found a burgundy piece of sheepskin! It was the perfect match to my fabric but out of my comfort level. The sales woman and I discussed. She was a bit on the wild side and while I hemmed and hawed, she kept saying, “I think it will be fabulous!”. I bought it and another piece of leather in case I backed out of adding the sheepskin and would have a plan B.
Construction on the vest is very straightforward and there are links to videos which walk one through tricky steps. Can I just say, I LOVE that there is no talking in the videos; they just show the process and have some text which makes them much shorter and more efficient than a lot of sewing videos. The videos and printed instructions are the same so one can refer back and forth.
I have had some experience sewing with leather and fur so did not feel daunted by the sheepskin even though it was very thick.
Here is a very brief overview of how I handled the sheepskin addition:
First, I realized pretty early on that my thin tweed was not going to hold up to the weight of the sheepskin so I did a lot of extra interfacing. About half way through the project I thought it would have been better to just underline all the outer tweed pieces with a silk organza. Interfacing ended up working okay because the sheepskin pieces are sitting on my shoulder and not hanging from the vest. A hem detail or pocket trim would have required more beef underneath.


Next, I glued the shoulder pieces in place using a tacky glue.

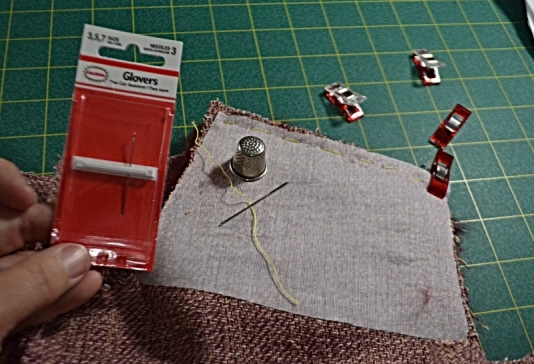
I was taught to always hand baste fur in place, other wise it will slip while sewing. Because I had glued the pieces I briefly thought about skipping this step but changed my mind. Better safe than sorry. This can be a bit tedious but is made easier by glovers needles and a thimble.
After sewing the shoulders together, I just continued on with construction as directed.
One of the best features of the pattern are the inseam pockets. I added tiny bar tacks at the top and bottom of each pocket.

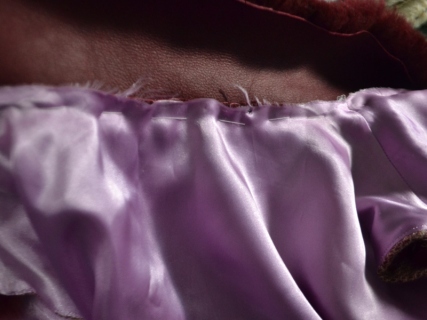
I decided to have one collar piece of sheepskin and fold it over to the inside. It seemed too high and bulky when standing if I did not fold it over and I did not want to mess with lining the sheepskin collar piece. Again, I hand basted, then sewed. Keeping the fibers out of the zipper teeth was a bit of a pain. I read somewhere putting a piece of ribbon between the teeth and fur helps prevent this but as I just had a small section of fur to deal with, I decided to tough it out.


The last step to the outer shell is the zipper closure. From zipperstop.com I ordered 4 zips in the hopes one would be a close enough match. My intention was to have the zip be partially exposed and to forgo the wind guard. One came in pretty much close to a perfect match!

After assembling the lining and outer shell, I then basted the lining to the top of the pressed opened collar seam, folded the fur down over the seam and hand sewed in place.

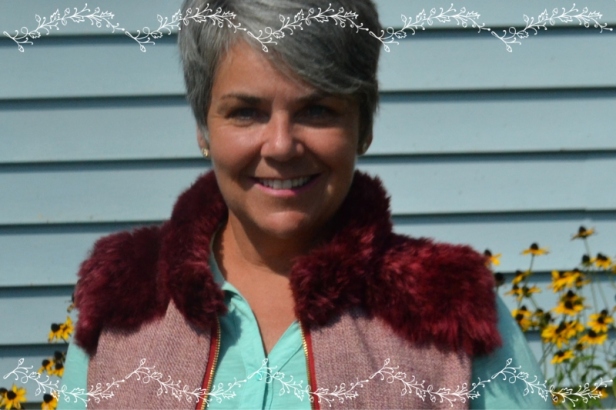
The finished garment!
I am extremely happy with this sew and plan on making more vest! During the T&T vest week, I picked up the men’s version as well and hope to make some of those for Christmas presents.
T&T is a past and current sponsor of our monthly sew along and sewing contest at this fb page.
I think I made the perfect vest for late summer, early fall in southern Indiana.
The full tour includes these talented sewists, so I hope you’ll follow along this week.
Sept. 10th Sewing A La Carte, Tenille’s Thread, A Custom Clothier, Made for Little Gents, Miss Marah Sewn
Sept. 11th Manning the Machine, mahlicadesigns, Sewing Vortex, Crafting Fiend
Sept. 12th Auschick Sews, Aurora Design Fabrics, My Heart Will Sew On, Vicky Myers Creations
Sept. 13th Flaxfield Sewing, Sewing with D, Musings of a Seamstress, Make it Sew with the Bear and Pea Atelier, Petite Font
Sept. 14th Sewing à la Carte, Sewing by Ti, Stitches by Laura, Sewing with Sarah, My Sewing Roots

Oh this is just wonderful! You have me thinking about adding some furry fabrics to my fabric library. Thanks for going into details on how you put it together. It’s so helpful to have someone walk you through to help you avoid missteps.
LikeLike
Thank you Melissa. I love working with fur and I think it really adds to most garments!
LikeLike
The fur trim totally takes this from a solid useful piece to KNOCK OUT!
LikeLike
You know I was nervous but just went with it. Helps having such a great leather shop down the road!
LikeLike
This looks fabulous Judy. The sheepskin collar really lifts it to another level.
LikeLike
Thank you Sue! Vest #2 on the cutting table!
LikeLike
that is gorgeous. looks so comfy.
LikeLike
It is comfy! Thank you Sharon.
LikeLike
I love Twig + Tale and their videos as well. Your vest is really stunning with the contrast fur!
LikeLike
Me too Diane! I purchased two more patterns from them during vest week.
LikeLiked by 1 person
Really great looking vest and the fur is such a great looking detail.
LikeLike
Thank you Sonja!
LikeLike
Wow, I would have never thought to do fur trim. That is amazing and so cozy.
LikeLike
A friend in our sew along fb group gave me the nudge to try it! So glad I did!
LikeLike